Editing the output documents templates
The content and formatting of reports with initial data and calculation results can be customized using the List & Label Designer report form editor built into the Hydrosystem. The template of each report generated by the program is a separate file:
init.lst – input data;
svod.lst – calculation summary (results by branches);
resist.lst (and the associated file resist_2ph.lst) – detailed results (by piping components);
hammer.lst – waterhammer results;
slug.lst – slug flow results (for gas-liquid flow analysis)
When installing the program, these files are copied in the Hydrosystem installation directory, by default "C:\Program Files (x86)\truboprovod\hst_eng". Therefore, before you start editing the output document forms, make sure that your Windows user account has write permissions to the directory where these files are located, otherwise it will be impossible to save the changes made to them. If you do not have write permissions to the directory with the output document form files, then in this case it is recommended to either contact the system administrator to obtain editing rights to this directory, or, if possible, run Hydrosystem as administrator, or move the forms to another folder and configure Hydrosystem to use forms from this folder (for more information, see here).
Before you start editing the output document templates, it is recommended to create a backup copy of template files.
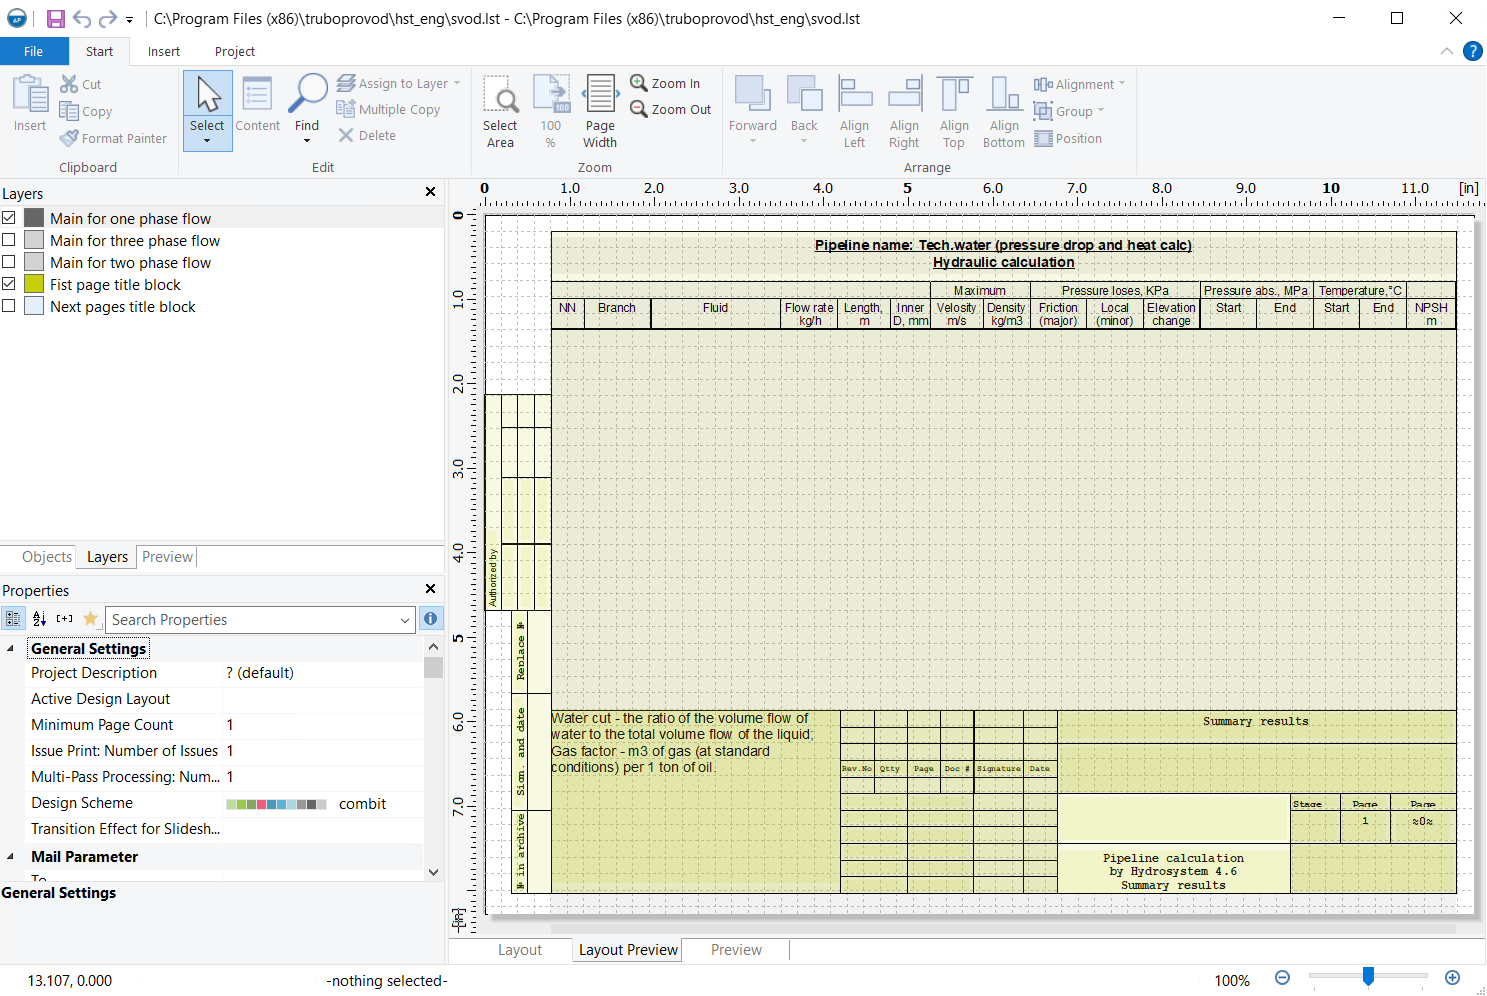
To start editing the output document forms, use the menu item "Tools - Form Editor" and select the report whose template you need to edit:
The central part of the form editor window contains the area for editing and previewing the document (in which, using the tabs below, you can switch between Layout, Layout Preview, and a combination of both). Each of the document forms consists of a set of tables, lines, rectangles, texts, and other "objects", the full list of which can be viewed in the "Objects" tab on the left. For convenience, all these objects are placed in different "layers" of the form, which are displayed in the "Layers" tab on the left. When editing forms, first of all, turn on the display of the layer(s) in which you need to make changes, and turn off the rest for convenience (some of the layers are printed in the same areas of the document, but, for example, on different pages, so in the form editor they can be displayed one on top of the other, which is not at all convenient).
The lower left part of the form editor window contains a properties window that displays the parameters of the currently selected object. The upper part of the window contains the standard form editor menu, which can be used to add new objects to forms, set up settings, etc.
Working with graphic objects (lines, shapes, drawings)
To edit the parameters of lines, rectangles, etc. that make up title block and outer table borders, select the object of interest in the Layout Preview window or the Objects window and then adjust its parameters in the Properties window - dimensions, line width, location, etc. To add new lines, rectangles, etc. (for example, if you need to draw your own stamp), activate the corresponding "Insert" menu item, then "draw" in the Layout Preview window the area where you want to add this object. If necessary, you can then more precisely adjust its location, thickness and other characteristics in the Properties window. In a similar way, you can insert an image from a file into a report (for example, if you need to add a company logo to a stamp) - activate the "Insert - Picture" menu item, then "draw" in the Layout Preview window the area to insert the image and select the image file.
To edit any text in a document (usually in or near stamps), double-click on the text with the left mouse button:
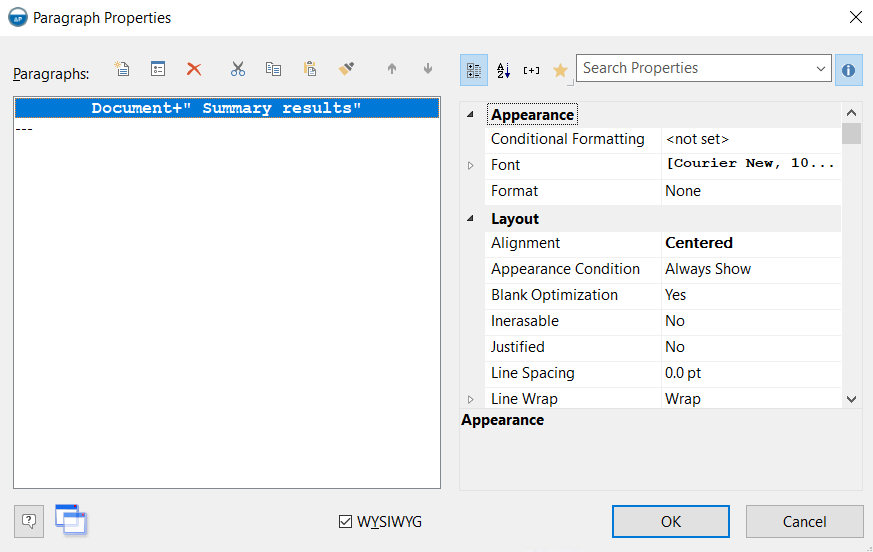
In the window that appears, you can set up text formatting (font, alignment, etc.) on the right side, and the text content on the left side. To edit the text content, double-click on the "paragraph" of text that you want to edit in the left side of the window:
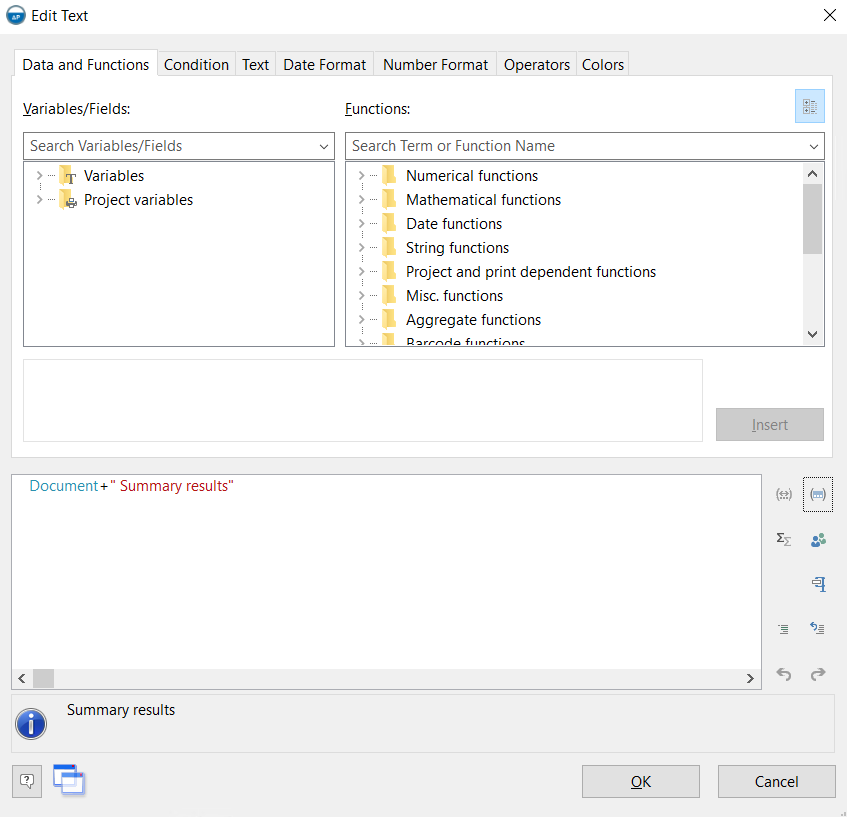
Texts can consist of a fixed part (displayed in blue) and variables (displayed in brown), the values of which are transferred to the form editor from the Hydrosystem. The fixed part, i.e. the text that will be output to the report without changes, must be enclosed in quotation marks. Variables must be connected to each other and to the fixed text using the "+" sign. For example, the screenshot above shows an example of text that consists of the 'Document' variable, which transfers the designation of the project document specified in the title block stamp from the Hydrosystem, after which the constant text " Summary results" is appended. Any fixed texts can be edited at your discretion, you can also add/delete variables to get the text you need in the field in the document you need. To add new texts, use the "Insert - Text" menu item, then "draw" in the Layout Preview window the area where you want to add this text and enter the text in the window that appears.
If necessary, various special functions and operators provided in the form editor can be used in texts. Below is a list of the most frequently used of them in practice:
Date$() - this function is used to display the current date in this text field. The date can be displayed in various formats, these formats can be viewed in detail (and immediately inserted into the text) on the "Date Format" tab of the "Edit text" window;
AskString$() - this function is designed to output some text to a document that is not originally in it and which may be different in different projects. For example, if you need to output some text comments next to a title block regarding the stage of execution of a current project ("Initial version", "Under approval", etc.), you can add a text field next to the title block stamp and enter approximately the following code:
AskString$("Enter the execution status of this calculation",False,"In progress",8192)
In this case, when outputting a document generated using this template, the following window will be displayed:

Whatever text the user enters in this window will be displayed in this field in the finished document.
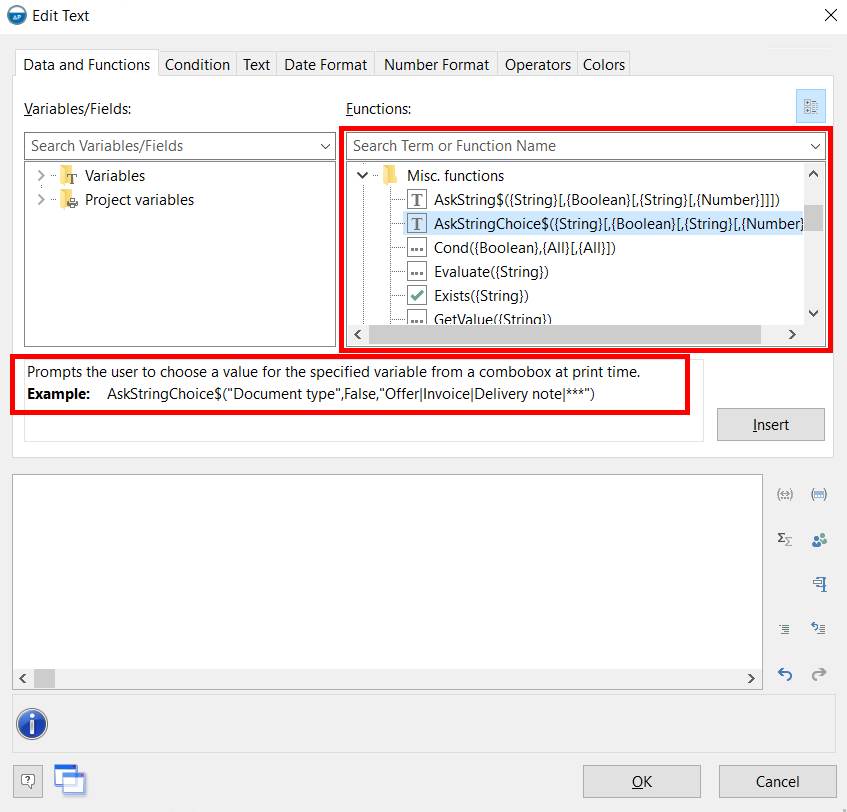
AskStringChoice$() - this function is similar to the AskString$() function described above, but when it is used, several preset text options are offered, from which the user selects the desired one when outputting the document. An example of using this function is given below:
AskStringChoice$ ("Select the required text option",False,"Option1|Option2|Option3",8192)
Fstr$() - this function converts a number into text with the required format (number of decimal places, type of separator between the integer and fractional parts, etc.). You can view these formats in detail (and immediately insert them into the text) on the "Number format" tab of the "Edit text" window. This function is convenient to use if you need to output calculation results to output documents with a certain accuracy (for example, with a certain number of decimal places) and in a certain format;
Val() - this function converts text into a number. This may be required to perform any calculations with the calculation results directly in the document form when it is generated (for example, if you need to automatically calculate the temperature difference at the beginning and end for each branch and enter it in some column in the table);
StrSubst$ () and RegExSubst$ () - these functions are used if you need to automatically replace part of the text with another in a text field. You can view the syntax and capabilities of these functions in detail by entering them in a text field.
A complete list of all available functions (with a description of their operation) is displayed in the corresponding field in the text editing window:
In addition, additional List&Label variables can be used in texts, using which any text data that is not initially in the report can be transferred. To do this, when specifying documents settings (in the main window of the Hydrosystem, not in the Form Editor), you need to add your own variables and their values:
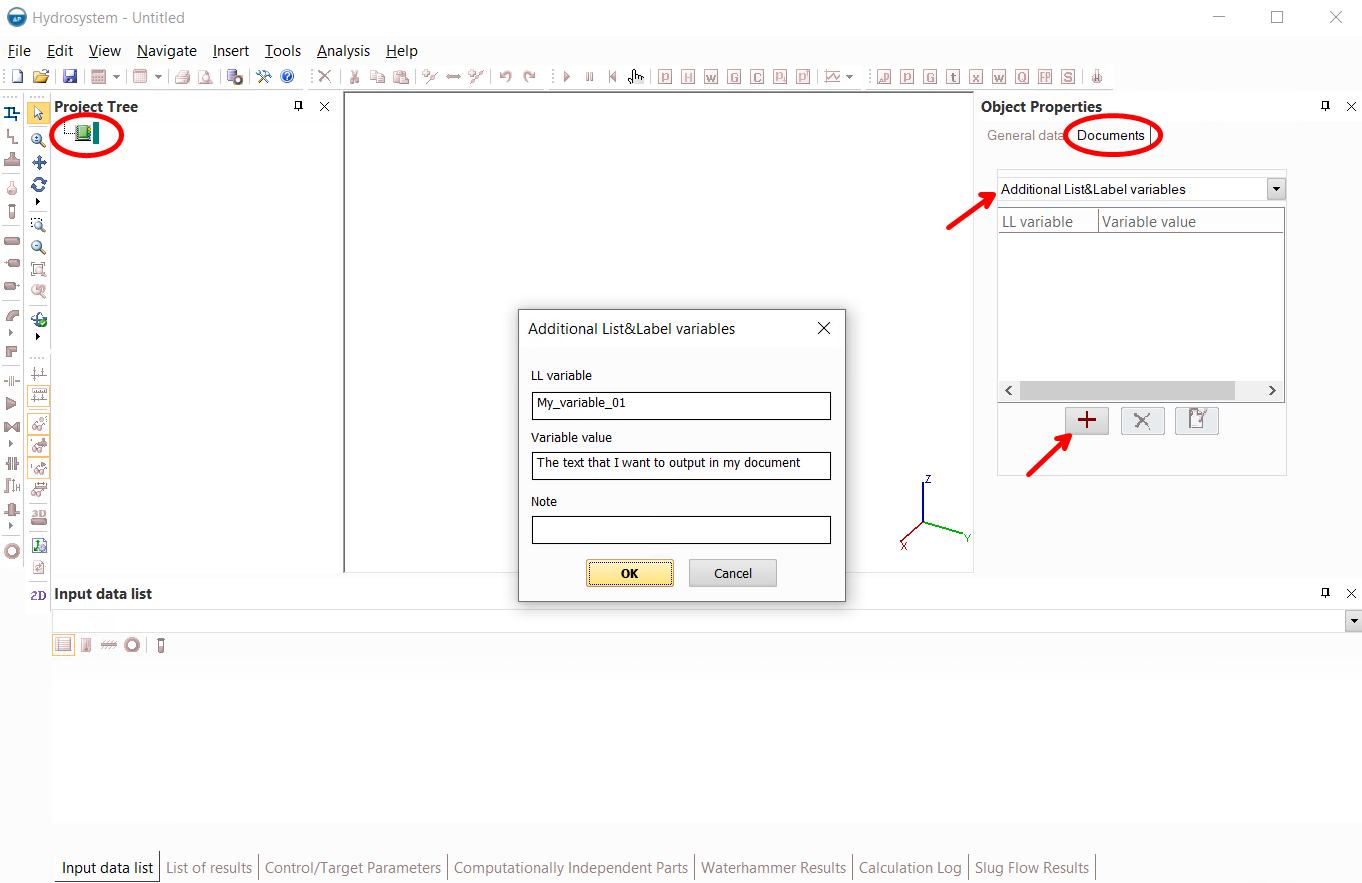
After this, you will need to insert this variable into the required text field of the document in the form editor, and when generating a report, its value will be output to this field. Using additional variables is essentially similar to using the AskString() function described above, but it is more convenient, since you do not need to enter the text that needs to be output each time you generate a report (the values of the variables can be set in the project data in advance, and they will be saved with the project). However, it is important to remember that when using additional variables in document forms, these variables must be set in the documents settings for each project, even if they are not used in this project (if the variable is not set, the report cannot be generated).
If any of the texts in the documents are displayed "ugly" in a report of any format (for example, if the text is displayed horizontally when exporting a report to Word with a 90-degree rotation), you can select this text and set "Yes" for the "Export as Picture" option for this text in the Properties window - in this case, you can avoid such display problems.
To edit a table with input data or calculation results, double-click on it with the left mouse button in the Layout Preview window:
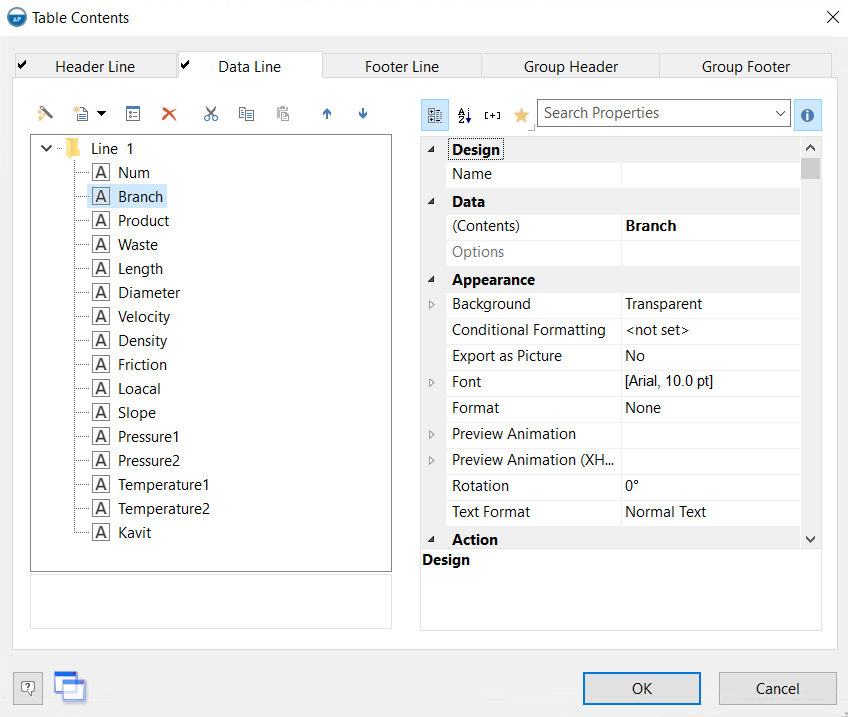
The Hydrosystem report tables consist of header lines (the first tab in the window in the figure above) - the table "header", and the data lines (the second tab from the left), in which the initial data/calculation results are displayed (group headers and footers are not used in reports). The corresponding tab in the field on the left contains a list of columns that make up this table; when you select the corresponding column in the list, the fields on the right display the text formatting settings for this column. Editing table columns is very similar to working with texts - you can edit the contents of a column, the font of the text in it, alignment, etc. in the same way (and different table columns can be assigned different formatting). In the formatting settings in the "Format" parameter, you can select a numeric format and specify how to output values in this column (what to use as a separator between the integer and fractional parts, how many digits to output after the decimal point, etc.). In addition, in the settings for each column, you can adjust its size, frame (on which sides of the column to draw lines, on which not to) and much more. If any text in a table in a document is too wide, as a result of which it "shifts" adjacent columns of the table, you can set "Shrink", "Truncate" and other options in the "Fit" parameter for this column. If some columns in the table are of no interest to you, you can delete them from the table (when deleting, do not forget to delete the corresponding column in the table "header").
After making all the necessary changes, save the output document form, and after that all the following reports will be generated according to the new edited form. In the description above only the most "popular" in practice functions of the form editor are shown. In addition, the editor has many other functions - for example, you can set display conditions for texts and other elements (for example, so that they are printed only on certain report pages), you can add additional pages with other information to the report etc.. If you are interested in these and other functions, a full detailed description of all the capabilities of the form editor can be found in its separate documentation, available on the computer where Hydrosystem is installed in the Windows menu "Start - Programs - Hydrosystem - Report Designer Manual".