
AMD64/Intel64/EM64T processor
Windows 10, 11
Memory: 4 GB RAM minimum
Graphics card with OpenGL 2.0+ support (2018 or newer):
Graphics driver from 2018 or newer
Minimum: NVIDIA or AMD/ATI cards (others may have limited functionality)
Recommended: NVIDIA GeForce 7000+ or AMD Radeon X300+ with 1GB+ memory
Screen resolution:
Minimum: 1280×1024
Network dongle servers require Sentinel HL or Guardant drivers (included in delivery).
Add PASS/START-PROF to your antivirus and DLP software whitelist (Symantec DLP, Trustwave DLP, McAfee Total Protection, Check Point DLP). Stable operation is not guaranteed if excluded.
To install PASS/START-PROF:
Warning: Remove dongle during installation to prevent damage
Verify system clock time for proper dongle operation
Log in with administrator rights
Run Setup.exe
Follow installation prompts for program location and menu folder
Insert dongle into USB port
Launch via Start Menu > START-PROF > START-PROF
For dealer deliveries: Send registration card for dongle activation. Use update string with dongle update utility.
Installation creates a "BASEOLD" folder containing previous database versions. Manually edited databases must be updated in the new version. Export customizations before upgrading.
Microsoft Windows Server 2003/2008 include Active Directory services with Group Policy for remote software deployment.
Available Active Directory installation methods:
Publish to User
Assign to User
Assign to Computer
START-PROF supports Assign to Computer only.
Important:
Installation completes after system reboot
Publish to User and Assign to User methods are not supported
For multi-computer deployment, create an administrative installation using ORCA MSI Editor. Generate setup.mst from START.msi/STARTPR.msi/STARTLT.msi with administrator modifications.
Recommended msi-file modifications before creating mst-file:
Table |
Parameter |
Description |
Directory |
INSTALLDIR |
START-PROF installation folder. Default: Program Files\START |
Directory |
SHELL_OBJECT_FOLDER |
Start Menu folder name. Default: START-PROF |
Property |
ProductLanguage |
1033 – English 1034 – Spanish 2052 – Chinese |
Full installation runs by default. Protocol and Hostname USB settings stored in HKEY_LOCAL_MACHINE\SOFTWARE\PSRE LTD\STARTXX\XX.XX\Settings
"Install USB dongle" program sets Protocol and Hostname in HKEY_CURRENT_USER\SOFTWARE\PSRE LTD\STARTXX\XX.XX\Settings. HKCU settings override HKLM when both exist.
For proper script display, install ISScript.msi correctly (http://answers.microsoft.com/en-us/windows/forum/windows_vista-windows_install/isscriptmsi/4d05efe5-4442-e011-9767-d8d385dcbb12).
Install USB drivers on local computers after software installation.
PASS/START-PROF includes copy protection that validates available licenses at runtime. Missing or invalid licenses generate error messages.
Available license types:
License Provider |
Description |
|
Sentinel HL |
Hardware Dongles |
USB
hardware key |
Guardant Sign |
||
Internet License |
Internet License |
Uses HTTP protocol |
Trial License |
Trial License |
Temporary
internet license available directly from application |
License provider details stored in license.txt. Users with multiple licenses can switch by pointing to different license files.
License recording to hardware keys or PASS ID linking uses license.txt settings file. User specifies this file at first launch. Program saves copy to %AppData%\PSRE\Licenses\oldnamepr.txt ("oldname" = original filename).
View current license details via Help > About. Include screenshot with license parameters and version number when contacting technical support.
Change licenses via Service > Load license file. Browse to new license file.
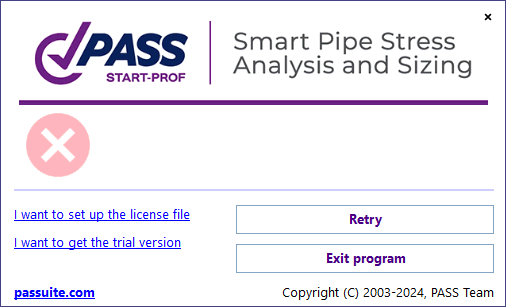
First launch without valid license shows error with options. Select "Set up the license file" for existing license files. "Retry" re-reads current license. Configure Internet License as described below.

Watch PASS internet license guide.
Register PASS ID at: https://lms.passuite.com/personal/signup.
PASS ID = {email, password} for internet license authentication. Use any valid email address. Program remembers PASS ID for future validations. Can also store in license file.
PASS ID registration is one-time process. Multiple licenses can link to one PASS ID. After registration, email sales manager (sales@passuite.com) to link license.
Internet License requires constant internet connection but no hardware key. Uses HTTP protocol - works if browser can access internet.
Proxy server settings apply automatically if configured.
LMS server location: https://lms.passuite.com.
LMS (License Management System) handles Internet Licenses, Trial Licenses, and automatic program updates.
Missing PASS ID in license file generates error.
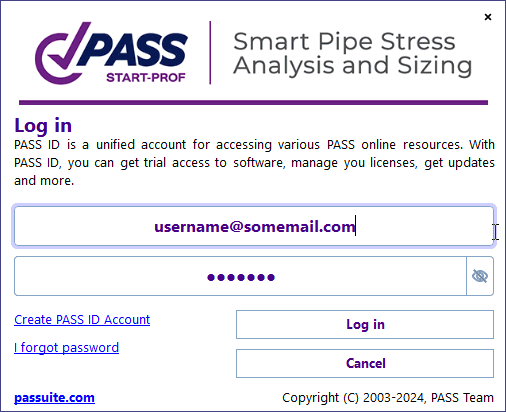
Enter valid PASS ID via "Retry" button. Authorization dialog appears for email/password used during registration. Register new PASS ID or recover password via links in same dialog.

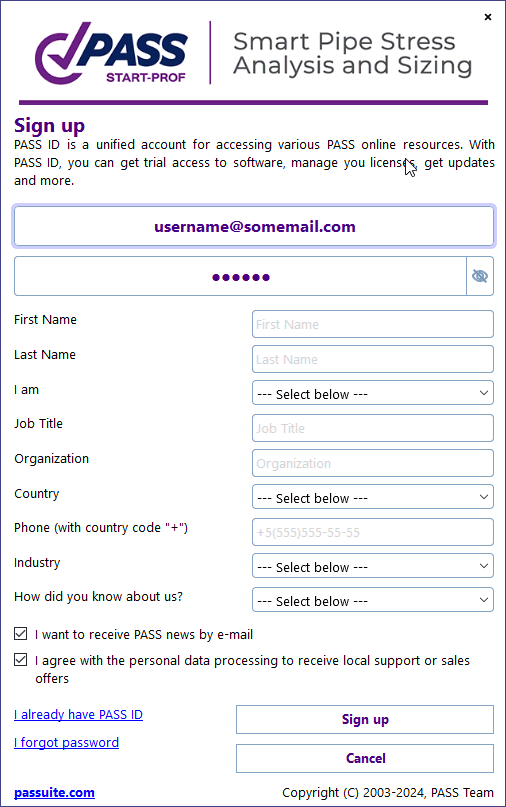
Fill out Trial License registration form. Successful registration creates PASS ID with attached Trial License. Process is automatic.
Same PASS ID works for Trial Licenses of other programs and commercial licenses.
Without commercial license, get trial version directly from program at first launch or license errors. Click "I want to get the trial version" link in dialog.

Complete form and click "Sign up". With valid entries and LMS connection, program waits for registration completion. Errors show for issues like existing PASS ID.
After email confirmation, program issues trial license file. Save file for program use.
Existing PASS ID users without license file: Click "I already have a PASS ID" in registration form. No confirmation needed - program issues license file after LMS response.
Hardware keys: Sentinel HL and Guardant Sign. Setup similar with minor differences.
Both key types work without drivers (driver-less configuration, USB HID mode).
Supplied license.txt contains key type and serial number. Usually no additional configuration needed. Key type (local/network) determined by remote=local|remote parameter in license.txt.
Latest generation Sentinel SuperPro dongles (purple/red) convert to Sentinel HL format. Leave conversion key in port, run KeySt update utility, follow instructions.
After conversion, KeySt generates status string. Send to managers. Receive update string to apply to dongle. Key then ready for use.
Local keys ready for immediate use. Insert key into computer USB port before launch. Verify key light stays solid. No light or flashing indicates insufficient USB power, faulty port, or faulty dongle.
With automatic updates enabled, local dongles update automatically for new versions and extended support. Manual updates and status/update strings not needed.
Network dongles install on user-selected network server. Access requires network license manager installation (varies by dongle type).
Missing dongle light indicates missing software (drivers, license manager).
Configure software for network dongle by editing license.txt with dongle server location. Use one parameter:
Parameter |
Value |
|
Dongle server IP address |
|
Key server network name (DNS) |
|
|
Network dongles don't update automatically. Update via KeySt utility (get status string, apply update string) or use as local key:
1. Connect dongle to local PC with program installed
2. Edit license.txt: set remote=local
3. Launch program, run automatic update
4. Return dongle and restore license.txt settings
Sentinel HL network dongles require license manager service on server (download). Compatible with server OS: Windows 7/8/10/11+, Linux Ubuntu, Linux RedHat, Linux common.
Sentinel LM uses TCP/UDP port 1947. After service installation/start, monitor dongles via web browser:
http://<dongle server>:1947
Local computer: http://localhost:1947 should show available dongles (with drivers). Manually add server IP/hostname in License Manager (Configuration > Access to Remote License Managers > add server IP in Remote License Search Parameters). Program cannot find dongle until it appears in list.
If START-PROF cannot see dongle:
1. Verify dongle on server: http://localhost:1947. If key not visible, check dongle connection and drivers. Dongle light should be solid.
2. Verify server identity: On local PC, go to http://[server IP]:1947. If page not visible, check hasplms.exe service.
3. Different network segments: On local PC, go to http://localhost:1947. Add server IP to Configuration page, Access to Remote License Managers tab.
Additional information: Sentinel Documentation.
Client guide: https://docs.sentinel.thalesgroup.com/ldk/LDKdocs/ACC/config_remote_lms.htm
Server guide: https://docs.sentinel.thalesgroup.com/ldk/LDKdocs/ACC/config_remote_clients.htm
Guardant network dongles require license manager service from manufacturer:
https://www.guardant.com/support/users/server/.
Guardant LM uses TCP/UDP port 3187, HTTP control port 3185. After service installation/start, monitor keys via:
http://<dongle server>:3185.
Guardant network dongle search uses additional "gnclient.ini" settings file. Created automatically from license.txt parameters in:
%APPDATA%\PSRE\<program id>\
LMS supports grdinipath parameter in license.txt for custom Guardant settings file path. Overrides default %APPDATA%\PSRE\<program id>\gnclient.ini location.
program_name parameter supported instead of program GUID. If set, file created/searched at:
%APPDATA%\PSRE\gnclient.ini
Note: gnclient.ini created once. Existing files not overwritten. Modify settings directly in gnclient.ini or delete file after license.txt changes. Also obtain from LM monitoring page (Menu "client ini-file settings").
Use KeySt.exe utility for dongle activation, support period extension, or license parameter changes. Access via Start > Programs > START-PROF > Dongle Update.
Send displayed Dongle status bar code to developers. Save to file via Save button for email delivery.
Dongle status bar changes each program launch. Codes cannot be reused.
Receive new code from developers. Insert in Dongle status bar dialog or load via Load button. Click Update dongle.
| Error Code | Short Description | Description |
| 20004 | ERROR_LMS_LOGIN_FAILED | Invalid PASS ID email or password |
| 20005 | ERROR_LMS_ALREADY_AUTH | Authentication already complete |
| 20006 | ERROR_LMS_AUTH_REQUIRED | Authentication required |
| 20007 | ERROR_LMS_FEAUTURE_NOT_FOUND | Module not found in license |
| 20008 | ERROR_LMS_LICENSE_NOT_FOUND | License not found for user |
| 20009 | ERROR_LMS_SERVICE_UNAVAILABLE | Server or network error - service unavailable |
| 20010 | ERROR_LMS_LICENSE_DISABLED | License inactive |
| 20011 | ERROR_LMS_FEATURE_LIMIT_EXCEEDED | Maximum license check-outs reached |
| 20012 | ERROR_LMS_LICENSE_EXPIRED | Temporary license expired |
| 20013 | ERROR_LMS_ALREADY_LEASED | License already checked out |
| 20014 | ERROR_LMS_INVALID_HANDLE | License provider internal error |
| 20015 | ERROR_LMS_OBJ_NOT_CACHED | License provider internal error - re-initialization required |
| 20018 | ERROR_LMS_STRANGER | Invalid server request - non-existent session data |
| 20019 | ERROR_LMS_INVALID_PARAMETER | Invalid server request - invalid parameter |
| 20020 | ERROR_LMS_ACTION_NOT_SUPPORTED | Invalid server call - invalid function number |
| 20021 | ERROR_LMS_LICENSE_VERSION | Invalid version number - license for lower version |
| 20022 | ERROR_LMS_SERVICE_BUSY | License provider busy - try again |
| 20023 | ERROR_LMS_INTERNAL_ERROR | License provider internal error |
| 20024 | ERROR_LMS_INVALID_LICFILE | Invalid license file format |
| 20025 | ERROR_LMS_INVALID_PRODUCT | Invalid program identifier |
| 20027 | ERROR_LMS_EOPEN_LICENSE_FILE | License file open error - not found or busy. Check path or file access |
| 20028 | ERROR_LMS_DONGLE_NOT_FOUND | Hardware dongle not found |
| 20031 | ERROR_LMS_FILE_DOWNLOAD | File download error |
| 20035 | ERROR_LMS_INVALID_DONGLE | Invalid dongle data |
| 20036 | ERROR_LMS_DONGLE_UPDATE | Dongle update error |
| 20037 | ERROR_LMS_PROXYAUTH | Proxy authentication required |
| 40000+ | Sentinel Dongle Errors | Add 40000 to Sentinel error codes: https://docs.sentinel.thalesgroup.com/ldk/LDKdocs/API-licensing/Licensing_API/Enumerations/Licensing_API_Status_Codes.htm |
| 40007 | Sentinel protection key not available | When using the network dongle, the program does not access the server directly but goes through a local license manager. If the target server does not respond to broadcast requests (this is usually the case if they are on different subnets, including over VPN), the local license manager cannot reach it, even when the correct server IP is specified in the program. You need to go to the local License Manager at http://localhost:1947, and in the Configuration section, under the Access to Remote License Managers tab, add the server's IP address to the list in the Search Options for Remote Licenses field. Make sure the Access to Remote Licenses checkbox is enabled. After this, the key installed on the remote server should appear in the list of keys in the local License Manager (the server name will be displayed in the Computer field). Until it appears in this list, the program will not detect the key. If the local License Manager at http://localhost:1947 is unavailable, you need to install it first (the same components as those installed on the server). |
| 50000+ | Internet Errors | Add 50000 to cURL error codes: https://curl.se/libcurl/c/libcurl-errors.html |
| USB sharing violation | Sharing violation - resource locked by another process. Example: opening already open file for writing. Some keys working while others fail indicates USB port driver/device conflict. Try different USB port, restart license manager service, reboot computer. Avoid USB hubs - connect key directly to computer port, preferably rear motherboard ports. Check port forwarding configuration in virtual machines. |
For hardware key and internet license issues, provide technical support with:
1. Current license.txt file
2. About window screenshot showing license provider settings
3. Program-generated error number